Sunday, 9 March 2014

Part of a little wedding gift I made...

So I wanted to make something personal to go with the rest of the gift I had for one of my really good friends.  I was also in the mood to do some wood burning….so I decided to create a name sign (the gift was for a wedding).

Wish you could create something similar?  It's not difficult and wood burning (also known as pyrography) is a lot of fun.

Here's what you need:

  • Wood
  • Pencil/eraser (for sketching)
  • Wood Burning Tool kit with a variety of ends (I use the Walnut Hollow Creative Versa Tool kit.  Buy it at Michaels when there's a 50% off coupon.  http://www.amazon.ca/Walnut-Hollow-23906-Creative-Versa-Tool/dp/B000VRRBRM)
  • Varnish
  • Sandpaper
First, decide on what you want the final image to look like and sketch it lightly on the wood.
Next, start burning away.
Then sand down any rough edges you may have.
Varnish.

Enjoy!
See.  It's easy!  You just have to have the patience to spend a few hours creating it on a Sunday afternoon.  

Here's the final product:

I hope Pat & Dawn like it :)
A.A.

Sunday, 2 March 2014

Just some pictures

Well I will have something to post next week, but because it's a gift, I can't quite post it yet (well, that and it's not quite finished yet…).

So…in order to tie people over (and because I've had NO time to do any art because of the insanity that is called work), I'm just going to put up a couple of pictures I've taken over the years.

Photo of my sister in the style of Annie Leibovitz

Just a little editorial type fashion piece

Enjoy!
A.A.

Sunday, 9 February 2014

I know it's been a while…but….

I finally finished Report Cards…..and that's what I've been buried under for the past several weeks…marking and report cards…the joy of being a teacher…..

So to tie you over…I decided to throw up some old photos I've taken in the past.  I apologize if I've thrown any of these images up before…..but photography used to be huge passion for me.  I still enjoy it…but i just don't have the time I wish I had to actually put into it these days…

So here are a 2 photos from a few years ago now…

The pansies were taken at my cottage and then I played in Photoshop to make it look like a painting….


The picture of my sister in pop-art style was also finalized in Photoshop.


Enjoy!

Thursday, 26 December 2013

I finally got to some painting….

Well, I finally got some painting done!  My niece loves owls…so I decided to paint a couple of cute little owls for part of her Christmas present!

Materials needed:
  • Gesso
  • Canvas
  • Pencil/eraser
  • Acrylic paints
  • Paint brushes
  • Water
  • Paper towel
The method to my madness:

It's the usual steps to creating any type of acrylic painting….

  1. First, I primed the canvas with a little gesso.
  2. After the canvas had set for 24 hours, I sketched my little owls onto the canvas.
  3. Then, I painted the owls and let them dry.
  4. Lastly, I completed the touchups.  
Here they are!  I hope she likes them!

One little owl…
The second little owl…
Both little owls, side by side.

Have a great day!

A.A.

Tuesday, 24 December 2013

So here's what I made for the kids in my class this year...

So I decided to make a little something for all the kids in my class this year.  I decided to make snowmen mugs and filled them with "Snowman Soup."

However, I decided to follow something on Pinterest that I had wanted to do for a few months…but it's definitely something that I DON'T recommend doing.  I wasted so much time!!!!

I decided to make the Sharpie mugs that you bake in the oven that are apparently "permanent."  Folks, don't waste your time!  I did a bunch of research on them and followed the tips provided by others who had similar problems that I did, and it still didn't work properly!  Parts of the snowmen faces continued to chip off.  Instead, I had to re-do all of them 3 times…and I ended up using ceramic paint instead (this can also be used on glass).  So don't go the Sharpie route (I even tried the oil paint Sharpie pens….still didn't work).

What you need:

What to do:
  1. Take any stickers off of the mugs.  Ensure that they are clean.  Use some rubbing alcohol to clean the surface you will be painting.
  2. Take the lids off the black and orange paints and replace the lids with the thin painting tips.   
  3. Draw the eyes and mouth onto the surface of the mug.
  4. Draw the carrot nose onto the surface of the mug.
  5. After drawing the snowmen faces on all of the mugs, let it dry.  I believe they need to dry for an hour before cooking.  
  6. Place all of the mugs on a cooking sheet (or two in my case).
  7. Place the cooking sheets holding the mugs into the oven.  Turn the oven on and up to 350 degrees Fahrenheit and cook for 30 minutes.  Once the 30 minutes is up, turn the oven off and leave the mugs in the oven.  If you take the mugs out of the oven right away, they can actually break from the drastic change in temperature.  
  8. Once the oven is cooled down, take the baking sheets with your mugs out, and place on top of the oven.  I let my mugs stay out overnight (it was late when I cooked them).
  9. Now, put together the little baggies of Snowman Soup.  I took a little baggie, put in a pouch of hot chocolate, small candy cane, marshmallows (for my kids who can have gelatin), and a little tag with the snowman soup verse.  I then topped each baggie off with a little snowman hat (I cut them out of black construction paper).  I also have a couple of kids who are lactose intolerant, so instead of putting hot chocolate pouches in the clear baggies, I put hot apple cider baggies in theirs, along with 2 candy canes.
  10. Place the baggies inside of the mugs.
A final mug after cooking
Snowman Soup!
The final product!

It makes a cute, cheap gift for anyone.  Guaranteed to be a hit!

A.A.

Monday, 23 December 2013

Just a cute little ornament!

I was planning on making more of these…I still have a plain wooden moose leftover.  So, I'll save it for next Christmas.

This is super easy to do & makes such a super cute little gift for a friend or family member.

Want to make one?  Here's what you need:

  • A wooden moose (or other creature)
  • Some scrapbook paper
  • White paint (or black)
  • A sponge (or small piece of a sponge)
  • Modge Podge
  • Pencil
Here's all you need to do:
  1. First, place the moose on top of the scrapbook paper (paper face up - otherwise it will be backwards), trace, and cut out.
  2. Next, use the Modge Podge as a glue and glue the scrapbook paper on top of the moose.
  3. Let it dry for about 20 minutes to half an hour.
  4. Take a little bit of paint and put it on the sponge.  Gently (and carefully) sponge paint around the edge of the moose.
  5. Let dry for about 45 minutes or so.
  6. Lastly, use the Modge Podge as a sealer/varnish and coat the ornament in several times.  I only did one on the back and several coats on the front.
See how easy that was?!  And it's so cute!

My little moose before the sponge paint.
The final result!

So easy to do & super cute!

A.A.


Sunday, 24 November 2013

Only a month until Christmas!

Hard to believe isn't it?

So in the spirit of Christmas, I decided to make a couple of snowman Christmas bulbs for the tree.  They're super easy to make for little gifts and really don't take a super long time to make.

Here's what you need:

  •  Clear, round glass bulbs (the ones you can decorate yourself).  And just a heads up: You can get a pack of them from Michael's usually 50% off every so often :).
  •  Black paint marker 
  •  Orange paint marker
  •  Fake snow, cotton balls, white glitter, or snowflake sprinkles (I used iridescent ones)
  •  Black felt
  •  Cardstock
  •  Top hat pattern
  •  Scissors
  •  Glue/Modge Podge 
  •  Glue gun & glue sticks
What to do… Start with the snowman face first:
1.  Take the top off the clear bulb.
2.  Fill it with snowflake sprinkles.  You'll either need a funnel or a piece of paper that you can fold into a funnel-like shape.  This was the part that I found took quite a while (especially with a large bulb…..).  Place the top back on the clear bulb like so:

This is what the bulb should look like once it's filled with snowflakes
3. Take your black paint marker and paint on the eyes and mouth.
4. Take your orange paint marker and paint on the carrot nose.
5.  Let it dry for a few minutes.  You don't want the paint to smudge.

Here's one of the snowmen faces

Next up… The top hat:
1.  Take the pattern and print it out on card stock (this is going to be a part of the actual top hat). 
2.  Cut out the pattern.
3.  Place each part of the pattern on top of the black felt and cut out.  
4.  Now trim down the pattern to where it says on the card stock.
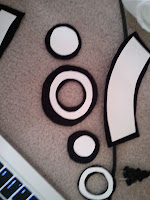
This is what it should look like once your card stock patterns are glued onto the felt cutouts.  
5.  Glue down each piece of card stock onto its matching felt piece.  Let it dry for about 1/2 hour.
6.  Roll the body of the top hat up, and glue with the glue gun where both sides line up.  Hold for a minute.
7.  Glue the bottom of the top hat to the bottom of the body of the top hat.
8.  Place the top hat onto the top of the bulb.  Attach an ornament hook to the top of the bulb and pull through the top of the hat.
9.  Poke the ornament hook through the middle of the top of the top hat.
10. Glue the top of the top hat to the body of the top hat.
11. Glue the top hat onto the head of the snowman.

And you're done!  They are ready to hang up on the tree!  Easy, no?


Enjoy!

A.A.