Tuesday 31 July 2012

Some Photos

So because I'm making you all wait until the end of the weekend to see my most recent creation (I don't wanna give the surprise away!), I decided I'd tie you over with some of my photography.  I have shot portraiture, commercial, landscape, and a mix and mash of all of the above.  I did college and university at the same time and my college diploma is in Creative Photography.  At Humber I shot mostly commercial and portraiture.  And before you make any comments, just remember: Photography is still art!

And.......because it's really nice out and we've been having fantabulous weather, I decided to stick in some nature photos.

The first two photos were taken at my cottage a couple of years ago.  While the final photo was just taken in my living room over a white backdrop.  I stole one of my mom's flowers from a bouquet...or should I say "borrowed....."

Enjoy!


*Please remember these photos belong to me*

A.A.

Tuesday 24 July 2012

Homemade Coasters = Way Better!

I can't believe I didn't think of this!  I got the idea from Pinterest....but I did this in Undergrad Photography...I just didn't mount my photo transfers...Stupid me!  How did I not think of this?

It's so easy....and ridiculously inexpensive!

What you need: Gloss gel medium (I used a Liquitex medium..but I think Golden also has one), laser prints, scissors, a ruler, & kitchen tiles.

*It is important to realize that these images will be reversed (not inversed...but reversed) when you take them up* (just thinking if you are using verses or a text on your coaster - you'll have to switch it around in Photoshop).

First decide what images you want to use.  You may need to resize them in Photoshop (I know I definitely did).  Put them on one sheet to save the cost.  Send them somewhere that prints on laser printers.  I just sent mine to Staples.  It cost like 39 cents or something.

Cut out your images and make sure they fit on the tile properly.  If not, do a bit of a trim up.


Use your finger or a brush to cover the tile in your Gloss Gel Medium.  Make sure it's a nice thick coat. Then place your image on the tile as you wish (image side down).  Place it firmly and make sure there are no bubbles or bumps.

Let the tile(s) sit for 6-8 hours.

Now it's time for the mess!  You'll need to be near a faucet or have a pan of water handy, as well as a rag.  You may even want rubber gloves.  Your fingers will feel pretty raw afterwards if you use your bare fingers (like I did....).  Soak your rag and place it on the tile for a minute or so.  Let your tile absorb the water.  Now, remove the rag and slowly start rubbing where the image is.  You'll notice that the paper will start to come up.  Continue to scrape/rub the paper off.  You'll start to notice your image on the tile!  You'll get to the point where it looks like your coaster is done and ready to go.  However, you'll probably notice as it dries that there is still paper covering the image.  You may have to do this several times to remove all the paper.  But once it's done, it looks beautiful!!!!  And, you can even do this on wood and other surfaces!  Now all I have to do is add some felt to the bottom and coat in varnish (for extra protection)!


A.A.


Friday 20 July 2012

Who gives a "hoot"

So I created my first little softie creature. Yes, she is hand sewn.  Cute, eh?  And bonus!  Not hard to make at all.  This is what you need: Fabric scissors, thread, felt, a needle, no sew glue, stuffing, and fabric paint.

First I drew an owl (just the main body) that I was happy with on cardboard and cut it out.  Next, I traced it onto the light pink felt and cut it out.  Once I checked the size of the owl and was happy with it, I cut out one more in the same light pink felt.  Next, I used one of my spools of threads as the circle template for the eyes.  I kept the eyes stuck together (to keep that "cartoonish" sort of gaze).  I cut the eyes out from a white fabric, cut out a beak from yellow fabric, cut out a little heart from light green fabric, and cut out a larger circle from a magenta coloured felt.  Oh yes!  And don't forget feet....I forgot the feet several times when I put her together...Oops....


After I had all those parts together, I glued on certain parts instead of sewing them to the owl.  I used the no sew fabric glue to glue on the eyes, beak, chest, and heart.  Then, I used my black fabric paint to draw on the pupils of the eyes.  To finish off the eyes and sort of provide them with a bit more depth, I took some white acrylic paint, placed a white circle in the middle of each pupil, and then finished them off with a tiny dab of black fabric paint over the white circles.  Now, keep in mind that if you decide to add little glimmers in your eyes like I did, you want to think of how you want your owl to be looking.  Here's an example of several ideas that you could use for the eyes:


Then I got busy sewing the body of my owl up.  I sewed the entire way around the body until I could only fit a finger or two into the bottom of the body.  Then I stuffed her with stuffing so she was a little more lively looking.  Now, I was a little ticked with myself because I realized I had forgotten the feet.....again!  So I had to sew the feet to the body last.  However, I would have much rather sewn the feet onto the back of the body before I stuffed her all up......Such a great little project to do on a summer afternoon.  She didn't take long to create at all - just the afternoon!  Plus, I could have even made little "Hoot" into a puppet if I didn't feel like stuffing her.


And....here she is...meet "Hoot!"


A.A.

Tuesday 17 July 2012

A little image of summer

I have been ridiculously lazy the past few days....but I'm starting a new little project tonight.  So in the next few days I should have a post up!

So.....to tie you over, here is an image I took in the backyard.  I decided to keep the focus on the flowers.  So I decided to befriend the layers in Photoshop, desaturate, and add a little gaussian blur to the scene.

Enjoy!


A.A.

Wednesday 11 July 2012

Flower Power

So the gf of one of my really close friends is due next week-ish?
Andddd I decided to make something for the nursery (A baby mobile to be exact!).  I apologize in advance if my explanations for each of the steps isn't overly clear and concise.  It's been a long day and some of the steps are easier to demonstrate than explain in words.....

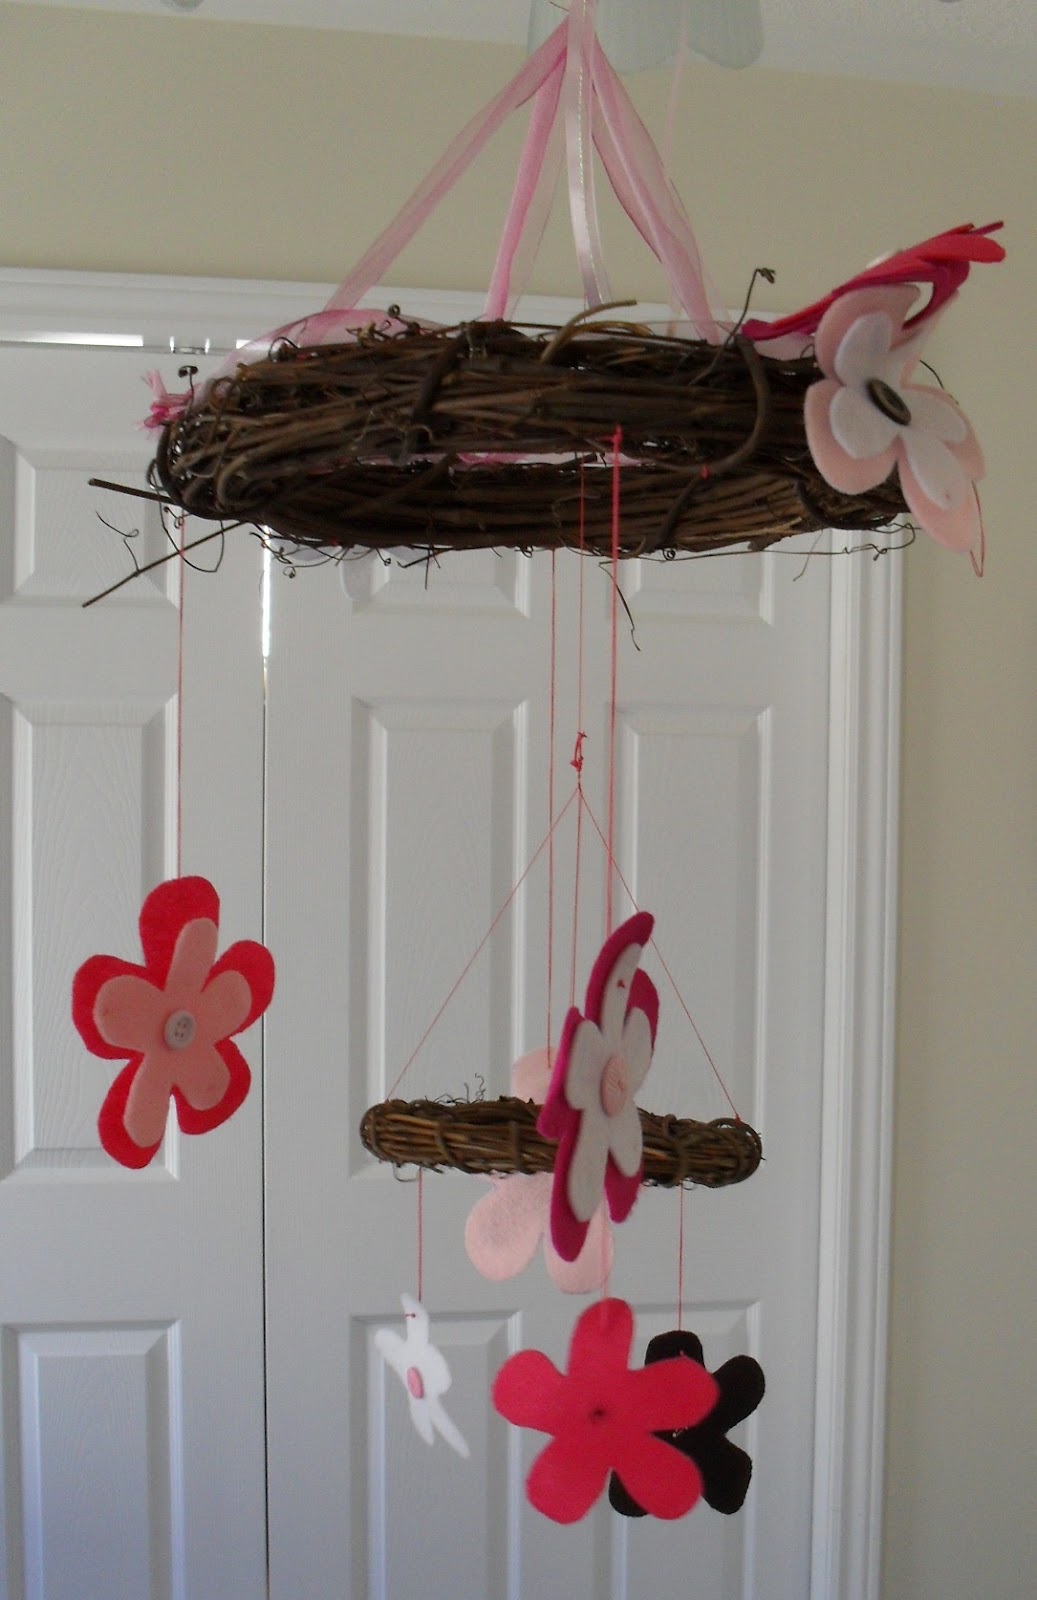
I've made mobiles before..but I decided to switch it up a bit..I decided to use wreaths instead of wooden rings for the structure of the mobile.  However, I'm not sure I had fun with these guys....I was constantly cursing as I worked away....and I don't recall cursing quite as frequently last time when I used wooden rings instead of wreaths........

This is what you need to create something similar to what I have created: Wreaths (two different sizes), a glue gun, ribbon, felt, a flower pattern, buttons, thread, a needle, and glass beads.

To begin, I found a flower pattern that I liked, created a traceable template on cardboard, and then started tracing a whole whack of them onto the felt.  I also created one size smaller so that I could put a smaller size in the middle of some of the larger flowers.  Then, I took my fabric scissors and cut all the flowers out (trust me, you get a very good hand workout from doing all the cutting...and make sure you have fabric scissors!).  Then, decide what smaller flowers you want to match up with the larger flowers and sew them together.  Next, you'll want to sew a button in the middle of each flower.  Now you have your flowers ready!


Next I decided to attach my wreaths together.  First created a hanger (with ribbon) and attached it to the larger wreath so that my mobile would be able to hang somewhere in the nursery.....Now, back to attaching these two wreaths together....This was the fun part...........I really cursed for a while during this point in time........It's really difficult to explain, but you want to hang the smaller wreath down lower and attach it to the larger wreath.  Make sure you have it hanging from something like a ceiling lamp or chandelier so that you can really get an idea of how you want the smaller wreath to hang.  After I FINALLY got the two wreaths attached and looking as I wanted them to (and after a lot of cursing and fighting gravity....), it was time to attach the flowers!  (Almost there!)


I picked up one of my flowers, knotted the end of the thread, pulled the needle through and held up the flower.  When I was content with my desired length, I weaved the thread through the wreath and knotted several times to ensure it was fastened tight.  Then you need to keep repeating this step with all of the flowers.  I attached the small, singular flowers to the small wreath (as you will see below).  Once you've attached all of your flowers, you're in the home stretch!!!!  All we need to do is throw in some beads!


This part only took about half an hour or so.  The finishing touch! Knot the end of the thread several times so that when you slide a bead on, it won't slide off the end.  Once you have it knotted, slide a bead on.  Then weave it through a part of the wreath and secure it from moving by knotting it around the wood of the wreath.  Then add another bead, knot it (to secure it in place), weave the thread through the wreath a bit and continue to knot and weave the beads through the wreath.  I did this bead weaving through both the large and the small wreath, but you could choose to weave through just the large one if you wanted.

And now after much fighting with, and cursing it, this baby project is done!  Woo hoo!!!!  Don't mind my hand....I hung it outside for pictures off one of the plant hangers.....


A.A

Saturday 7 July 2012

Let the summer begin with Baby Ben

So I was definitely super pumped to make something for a special little guy who is visiting from Manitoba.  I just had to make something!  I mean, how could I not?!

So I busted out some canvas, water, brushes, some wooden letters, and my acrylics.

I decided to go with a dinosaur theme, as it is for a little boy and dinosaurs seemed to be a consistent theme in the registry.  I mean, what little boy doesn't love dinosaurs?!

Being the perfectionist I am I also busted out the wax paper and sharpie.

Here's a good tip perfectionists: Sketch out what you want, place it under wax paper, trace over it with a sharpie, flip it over on your canvas and go over it with a pencil.  What you created with your sharpie will show up on your canvas.  I'm a perfectionist and I don't like to chance these things....what can I say....


So I painted the little dinosaurs first.  I always do my highlights and touch-ups last (as much as it bugs me having to wait until the very end).  I also decided for the sky that I would add some iridescent medium to add some shimmer.  I absolutely love iridescent medium.  It has become one of my new "faves."


Oh!  And if you ever decide to add wooden letters to your artwork, don't forget to sand those rough edges.  It only takes a few seconds, but it is definitely worth saving yourself from getting slivers.

You can see how the painting progressed as time lapsed over 2 days.  I know, I know....I really need to stop cutting things so close to the deadline......but.....on the plus side of that, I do work best under pressure!

And here is the final piece!


Enjoy!
A.A.