Sunday, 24 February 2013

Bring on Spring!

Okay, I'll admit it.  I have the winter blahs and can't wait for spring!
Plus, I needed a good stress reliever and what better form of relaxation than art!

I got the button art idea from Pinterest and loved the way it looked, so I decided to give it a shot.
Plus, I love those "Advice from a..." posters/art I have seen online.  They're full of great wisdom and advice!  They've got all different ones...like "Advice from a Rainbow"..."Advice from a Stream," etc.  So I put the two together and added some paint to jazz it up a little more.

These are the materials you need for this mixed-media creation:
-Buttons (green in this case) - you can get a whole wack of whatever colour you want from Dollartree for $1!  They are amazing!
-Canvas
-Paint
-Paintbrushes in a variety of sizes and shapes
-Hot glue gun & glue sticks
-Words of wisdom

Here are the steps you need to follow in order to create something similar:
1. Sketch out your creation on the canvas.
2. Start painting (I usually start with the sky first because it's the lighter of the colours.
3. Always add the words of wisdom last.
4. Once it's dry, place the buttons on the skeleton of the tree.  I placed all of mine first and then glued them on because it's all about looking right...and trust me, there were many buttons I had originally placed on this tree that I had to remove because they just didn't look right!
5. Once it's dry, remove all the hot glue strings (this takes a while, and to be honest, I needed to bust out my tweezers to get a number of small strings removed...).

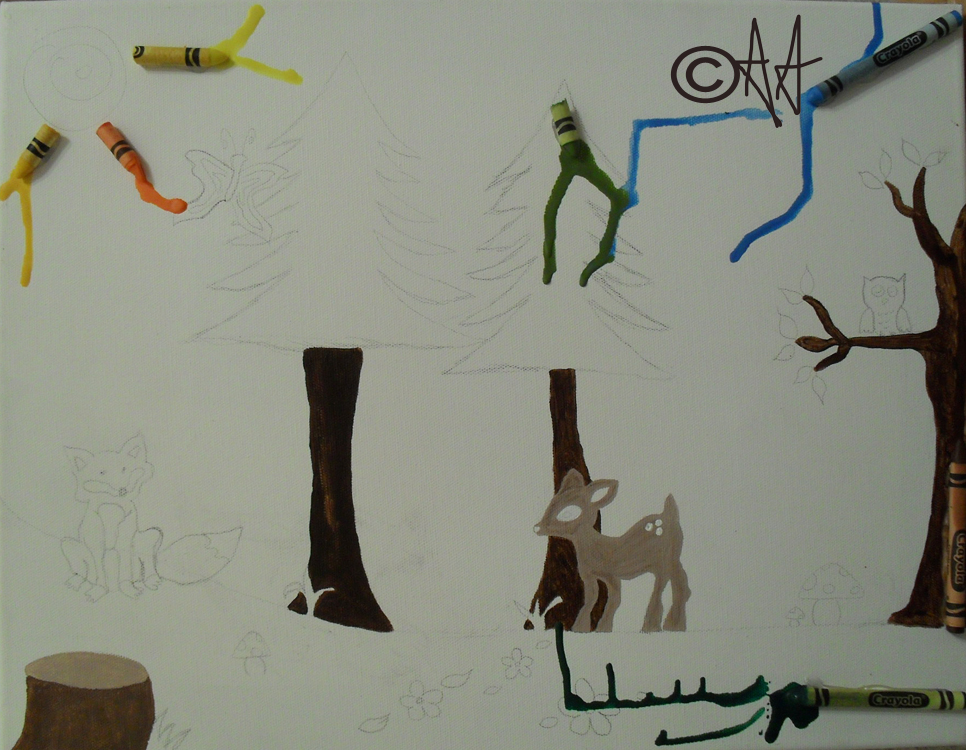
Here's how my tree looked as it progressed (yes, I did remember to take pictures this time!).....


And here is my final product!


Enjoy the rest of the weekend!
A.A.


Saturday, 16 February 2013

Look what I made for the kids @ work!

Got some extra rice kicking around the house?  Make an I Spy game!
After all, what kid doesn't love the I Spy books?!


Okay...so I needed to do something with a HUGE bag of rice I had that I couldn't cook (because I used it to absorb coffee when I spilled coffee all over my carpet and my laptop chord......urgh!). I can't take credit for the idea...but I can take credit for putting this together and making a couple of the little pieces from Fimo.....Actually, I had so much rice from my little incident that I created two of these I Spy games - one for my mom's classroom and one for my library :).

I got the idea from Pinterest (I can't get enough of that site....).  This is a nice easy project, but it can be a little time consuming to put together.....It's worth it in the end though!

Here's what you need to make your own I Spy game:
-A plastic or glass jar with a lid (unfortunately I couldn't get a transparent plastic one....)
-Duct tape
-Paint pen (for writing on the top)
-Objects to search for (i.e. a marble, a letter, a number, a leaf from a fake plant, a star, etc.)
-Recipe cards
-A camera
-A Sharpie
-Rice

Procedure:
1. Take pictures of all of the objects.  Load the pictures onto your computer.
2. Put some of the rice in the jar.
3. Put some of the objects in the jar.
4. Put more rice in the jar.
5. Put the rest of the objects in the jar.
6. Fill the rest of the jar with rice.  You may need to unscrew the lid, shake it up, place more rice in, screw the lid on and see if you can add any more rice.  I had to do this several times because when I thought it was full enough....it turned out it wasn't....
7. Send your pictures to get printed (or print them off from your own printer - it just depends on how you want to format your picture cards).
8. Once your pictures are printed, cut them out with a paper cutter and then glue them onto index cards.  Some people put small pictures of all of the objects onto one large card.  That's another option.  You can get really creative with this part.  I kept mine pretty plain Jane.  I just wrote "I spy...." and then the object name at the bottom of the card.

This is how my final set of cards turned out :)
9.  Hole punch each card and put on a binder ring (you can get these at the Dollar Store).
10. Duct tape the circumference of the jar (top) so that kids can't pull the lid off.  I'm also going to be writing a little reminder that if anyone attempts to remove it, the privilege is removed for all students.....I also plan on keeping mine on my desk with a sign about only teachers being able to carry it.....so that the kids don't just take it on me....

This is the final product:

Minus the duct tape....I put that on afterwards!
And again - different angle
I put one super challenging little shape in.......My Nanna gave it a test run and it took her about 30 minutes to find every shape in the jar (because of the tiny gold star....I like a challenge, what can I say...).  I also plan on putting a pretty little bow at the top....

It's definitely a great way to keep kids busy!

Enjoy the Family Day weekend!

A.A.

Sunday, 13 January 2013

Just a little somethin'

So I kind of wanted to jazz up a birthday gift for my sister's fiancĂ©.  It looked plain and lame.

I decided to make a mini monster gift bag for the iPod adapter for his new iPod (for those of you who don't know, the new iPod plugs/adapters are different because they changed them....which I'm sure Steve Jobs is rolling in his grave about as we speak...).  I plan on making more of these in the future and even changing some from little baggies to gift card holders.  They're a cute little way to jazz up a gift.

The materials you need for this project are:

  • Fabric and felt of your choice
  • Needle and thread
  • New sew fabric glue
  • Buttons
  • Ribbons
  • Yarn in a variety of colours
  • Fabric scissors
  • Ruler
Here's the procedure for this project:

1.  Measure the object you need your monster bag for (in my case it was an iPod adapter).  Adjust the measurement so that there is about an inch extra around the perimeter (for sewing and goof-ups).  Make sure you draw the shape you need to cut out.
2.   Cut out the shape.
3.   Trace this shape on the fabric.
3.   Cut out.
4.   Flip the two shapes so that they are upside down.  
5.   Start sewing around the outside edges.
6.   Once you have sewn all but one side, flip your baggie from being inside out so that it is no longer inside out.
7.   Place a button where you wish it to be acting as an eye.  Sew this eye on (you may need to flip your baggie inside out again).  Repeat this step for eye #2 (if you want 2 eyes - you could always do a cyclops monster).
8.   Cut out teeth or a mouth from felt and glue on with fabric glue.
9.   Cut out a nose from felt and glue on with fabric glue.
10. Cut some small (or long - depending on which you prefer) yarn pieces and take the yarn apart (I like to call it dissecting...I know.....I'm morbid.....lol).  Arrange and glue this yarn onto your monster.
11.  Add any additional accents or pieces to your monster.
12.  Let your monster dry overnight.
13.  Place your gift in your baggie.

I guarantee people will enjoy this!  It's such a simple way to jazz up a gift and the possibilities of this are ENDLESS.

Here's my final product!


Have fun!

A.A.

Sunday, 6 January 2013

Urgh! I hate it!

So those of you perfectionists out there will understand my pain and frustration.

I created a piece of work (crayon art to be exact) over this holiday break and I HATE it.  Originally I had designed it for work for the kids to enjoy....but I'm not sure it will ever make it's way up on the wall because I can't stand the damn thing.  And I mean, who wants to stare at something all the time when they can't stand it, right?

So, with crayon art, you know the drill......

1. Sketch it all out on your canvas.
2. Choose your crayons, break 'em, and glue em.
3. Take your hair dryer and melt your crayons over the canvas.
4. Paint around the scene.

Believe it or not, I re-did so much of this whole piece I'm surprised I didn't just take an x-acto to it (yes, I have been known to do that with pieces I create (or start to create) and don't like).

So here is the beast I can't stand.....Believe it or not I did remember to take pictures as it progressed.  There was one point where the grass was a dark green and the sky was a dark blue...and all of the flowers were different colours as well.....I re-did this whole thing so much I can't stand looking at it...but here it goes....


Currently it is sitting on my little table-top easel, but I'm tempted to kick it off and stomp on it.....

A.A.

Friday, 28 December 2012

The Homemade Gift Card Sleeve

Unfortunately I was too deep in thought to remember to take pictures as I went along.......So all I have to show is the final product.

I have to admit that as much as I love gift card holders/sleeves, some of them are kind of lame and it becomes redundant when you get several of the same gift card...so I like to spice it up and make mine different and more personal.

If you're interested in making your own gift card sleeves, this is what you need:
-Stamps & Ink
-Scrapbook paper/cardstock/old cards
-Pencil crayons
-Thin felt-tip pen(s)
-Glue/glue dots
-Scissors
-Accents (i.e. cricut cutouts, gems, glitter, stickers, ribbon, etc.)
-An old gift card holder
-Pencil
-Hot chocolate & Baileys or a glass of Wine (optional)

The first thing I always do, is I get one of my old gift card holders and take it apart.  Now, when I say I take it apart, I just make sure I un-attach where the gift card is glued.  I flatten it out, place it on the paper or cardstock I want to use and trace it.  Then I cut it out and make the folds where it will be glued.  The rest is up to you!  Add greetings, sayings or quotes, stamp or glitter it up, and have fun!  Once you've jazzed up your sleeves, glue at the folds and throw in your gift cards!

These were the ones I created this year:


My dad even complimented me on the one he got!  He NEVER does that!  So I  must have done an okay job!

Happy Crafting!

A.A.

Thursday, 27 December 2012

One of the little Christmas gifts I made this year!

So I'm a total tool and deleted all the pics off my camera.... (urgh!).
I'm having a really good start to the day......and it's not even Monday......Awesome.....

Anyways...onto the post....

I made a couple of these cute little bulbs for Christmas.  I made one for my best friend's brother, another for my Dad, and I have one more kickin' around here for a future gift perhaps....

This is a super cute, super easy, inexpensive gift to put together for the men in your life that either have a moustache or enjoy participating in Movember.  And I guarantee they will enjoy it!

This is what you need: A ceramic or glass Christmas bulb (grab 'em when they're 50% off ;)) and a black Sharpie.  You could also always throw a ribbon or bow at the top as well if you wish.

This is what you do: Take your sharpie and draw a moustache where you wish on your bulb.  Then, write "Stashing through the snow" somewhere on your bulb.  Easy, right?  You're done!  See!  I told you it was easy!  Quick, easy, and inexpensive!  It's the perfect gift!  I placed my moustache and my words in different places on all of the bulbs I made just to see what I liked best.  You can get creative with the lettering and placement to jazz them all up and make them all slightly different.  And, if the gift is for an older male, you can always do the writing and drawing with a silver Sharpie.  Not that I'm suggesting or implying anything..... ;)

Here's one of my final products!


And here is the one I gave to my dad on the tree.  He LOVED it!

A.A.


Monday, 17 December 2012

More Crayon Art....

So I was in an artistic mind-set yesterday and decided to do another crayon art.  This time the subject was little owls.  I think owls are so cute!  This one isn't for work..but I'm hoping to create a couple more pieces over the break.....

By now you probably know how this works.....

1. Sketch out the project.
2. Glue the crayons on the canvas.
3. Melt the crayons with a hair dryer.
4. Paint the rest of the picture.
5. Varnish (optional).

I meant to take an image of the original sketch with the crayons placed on it...but I just kept going without thinking.....

So here is what the project look like near the beginning.....


And a little farther on....


And here is the final product!


Enjoy!


A.A.