Sunday, 24 February 2013

Bring on Spring!

Okay, I'll admit it.  I have the winter blahs and can't wait for spring!
Plus, I needed a good stress reliever and what better form of relaxation than art!

I got the button art idea from Pinterest and loved the way it looked, so I decided to give it a shot.
Plus, I love those "Advice from a..." posters/art I have seen online.  They're full of great wisdom and advice!  They've got all different ones...like "Advice from a Rainbow"..."Advice from a Stream," etc.  So I put the two together and added some paint to jazz it up a little more.

These are the materials you need for this mixed-media creation:
-Buttons (green in this case) - you can get a whole wack of whatever colour you want from Dollartree for $1!  They are amazing!
-Canvas
-Paint
-Paintbrushes in a variety of sizes and shapes
-Hot glue gun & glue sticks
-Words of wisdom

Here are the steps you need to follow in order to create something similar:
1. Sketch out your creation on the canvas.
2. Start painting (I usually start with the sky first because it's the lighter of the colours.
3. Always add the words of wisdom last.
4. Once it's dry, place the buttons on the skeleton of the tree.  I placed all of mine first and then glued them on because it's all about looking right...and trust me, there were many buttons I had originally placed on this tree that I had to remove because they just didn't look right!
5. Once it's dry, remove all the hot glue strings (this takes a while, and to be honest, I needed to bust out my tweezers to get a number of small strings removed...).

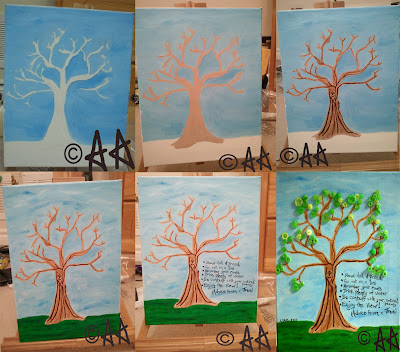
Here's how my tree looked as it progressed (yes, I did remember to take pictures this time!).....


And here is my final product!


Enjoy the rest of the weekend!
A.A.

Saturday, 16 February 2013

Look what I made for the kids @ work!

Got some extra rice kicking around the house?  Make an I Spy game!
After all, what kid doesn't love the I Spy books?!


Okay...so I needed to do something with a HUGE bag of rice I had that I couldn't cook (because I used it to absorb coffee when I spilled coffee all over my carpet and my laptop chord......urgh!). I can't take credit for the idea...but I can take credit for putting this together and making a couple of the little pieces from Fimo.....Actually, I had so much rice from my little incident that I created two of these I Spy games - one for my mom's classroom and one for my library :).

I got the idea from Pinterest (I can't get enough of that site....).  This is a nice easy project, but it can be a little time consuming to put together.....It's worth it in the end though!

Here's what you need to make your own I Spy game:
-A plastic or glass jar with a lid (unfortunately I couldn't get a transparent plastic one....)
-Duct tape
-Paint pen (for writing on the top)
-Objects to search for (i.e. a marble, a letter, a number, a leaf from a fake plant, a star, etc.)
-Recipe cards
-A camera
-A Sharpie
-Rice

Procedure:
1. Take pictures of all of the objects.  Load the pictures onto your computer.
2. Put some of the rice in the jar.
3. Put some of the objects in the jar.
4. Put more rice in the jar.
5. Put the rest of the objects in the jar.
6. Fill the rest of the jar with rice.  You may need to unscrew the lid, shake it up, place more rice in, screw the lid on and see if you can add any more rice.  I had to do this several times because when I thought it was full enough....it turned out it wasn't....
7. Send your pictures to get printed (or print them off from your own printer - it just depends on how you want to format your picture cards).
8. Once your pictures are printed, cut them out with a paper cutter and then glue them onto index cards.  Some people put small pictures of all of the objects onto one large card.  That's another option.  You can get really creative with this part.  I kept mine pretty plain Jane.  I just wrote "I spy...." and then the object name at the bottom of the card.

This is how my final set of cards turned out :)
9.  Hole punch each card and put on a binder ring (you can get these at the Dollar Store).
10. Duct tape the circumference of the jar (top) so that kids can't pull the lid off.  I'm also going to be writing a little reminder that if anyone attempts to remove it, the privilege is removed for all students.....I also plan on keeping mine on my desk with a sign about only teachers being able to carry it.....so that the kids don't just take it on me....

This is the final product:

Minus the duct tape....I put that on afterwards!
And again - different angle
I put one super challenging little shape in.......My Nanna gave it a test run and it took her about 30 minutes to find every shape in the jar (because of the tiny gold star....I like a challenge, what can I say...).  I also plan on putting a pretty little bow at the top....

It's definitely a great way to keep kids busy!

Enjoy the Family Day weekend!

A.A.