Thursday, 26 December 2013

I finally got to some painting….

Well, I finally got some painting done!  My niece loves owls…so I decided to paint a couple of cute little owls for part of her Christmas present!

Materials needed:
  • Gesso
  • Canvas
  • Pencil/eraser
  • Acrylic paints
  • Paint brushes
  • Water
  • Paper towel
The method to my madness:

It's the usual steps to creating any type of acrylic painting….

  1. First, I primed the canvas with a little gesso.
  2. After the canvas had set for 24 hours, I sketched my little owls onto the canvas.
  3. Then, I painted the owls and let them dry.
  4. Lastly, I completed the touchups.  
Here they are!  I hope she likes them!

One little owl…
The second little owl…
Both little owls, side by side.

Have a great day!

A.A.

Tuesday, 24 December 2013

So here's what I made for the kids in my class this year...

So I decided to make a little something for all the kids in my class this year.  I decided to make snowmen mugs and filled them with "Snowman Soup."

However, I decided to follow something on Pinterest that I had wanted to do for a few months…but it's definitely something that I DON'T recommend doing.  I wasted so much time!!!!

I decided to make the Sharpie mugs that you bake in the oven that are apparently "permanent."  Folks, don't waste your time!  I did a bunch of research on them and followed the tips provided by others who had similar problems that I did, and it still didn't work properly!  Parts of the snowmen faces continued to chip off.  Instead, I had to re-do all of them 3 times…and I ended up using ceramic paint instead (this can also be used on glass).  So don't go the Sharpie route (I even tried the oil paint Sharpie pens….still didn't work).

What you need:

What to do:
  1. Take any stickers off of the mugs.  Ensure that they are clean.  Use some rubbing alcohol to clean the surface you will be painting.
  2. Take the lids off the black and orange paints and replace the lids with the thin painting tips.   
  3. Draw the eyes and mouth onto the surface of the mug.
  4. Draw the carrot nose onto the surface of the mug.
  5. After drawing the snowmen faces on all of the mugs, let it dry.  I believe they need to dry for an hour before cooking.  
  6. Place all of the mugs on a cooking sheet (or two in my case).
  7. Place the cooking sheets holding the mugs into the oven.  Turn the oven on and up to 350 degrees Fahrenheit and cook for 30 minutes.  Once the 30 minutes is up, turn the oven off and leave the mugs in the oven.  If you take the mugs out of the oven right away, they can actually break from the drastic change in temperature.  
  8. Once the oven is cooled down, take the baking sheets with your mugs out, and place on top of the oven.  I let my mugs stay out overnight (it was late when I cooked them).
  9. Now, put together the little baggies of Snowman Soup.  I took a little baggie, put in a pouch of hot chocolate, small candy cane, marshmallows (for my kids who can have gelatin), and a little tag with the snowman soup verse.  I then topped each baggie off with a little snowman hat (I cut them out of black construction paper).  I also have a couple of kids who are lactose intolerant, so instead of putting hot chocolate pouches in the clear baggies, I put hot apple cider baggies in theirs, along with 2 candy canes.
  10. Place the baggies inside of the mugs.
A final mug after cooking
Snowman Soup!
The final product!

It makes a cute, cheap gift for anyone.  Guaranteed to be a hit!

A.A.

Monday, 23 December 2013

Just a cute little ornament!

I was planning on making more of these…I still have a plain wooden moose leftover.  So, I'll save it for next Christmas.

This is super easy to do & makes such a super cute little gift for a friend or family member.

Want to make one?  Here's what you need:

  • A wooden moose (or other creature)
  • Some scrapbook paper
  • White paint (or black)
  • A sponge (or small piece of a sponge)
  • Modge Podge
  • Pencil
Here's all you need to do:
  1. First, place the moose on top of the scrapbook paper (paper face up - otherwise it will be backwards), trace, and cut out.
  2. Next, use the Modge Podge as a glue and glue the scrapbook paper on top of the moose.
  3. Let it dry for about 20 minutes to half an hour.
  4. Take a little bit of paint and put it on the sponge.  Gently (and carefully) sponge paint around the edge of the moose.
  5. Let dry for about 45 minutes or so.
  6. Lastly, use the Modge Podge as a sealer/varnish and coat the ornament in several times.  I only did one on the back and several coats on the front.
See how easy that was?!  And it's so cute!

My little moose before the sponge paint.
The final result!

So easy to do & super cute!

A.A.


Sunday, 24 November 2013

Only a month until Christmas!

Hard to believe isn't it?

So in the spirit of Christmas, I decided to make a couple of snowman Christmas bulbs for the tree.  They're super easy to make for little gifts and really don't take a super long time to make.

Here's what you need:

  •  Clear, round glass bulbs (the ones you can decorate yourself).  And just a heads up: You can get a pack of them from Michael's usually 50% off every so often :).
  •  Black paint marker 
  •  Orange paint marker
  •  Fake snow, cotton balls, white glitter, or snowflake sprinkles (I used iridescent ones)
  •  Black felt
  •  Cardstock
  •  Top hat pattern
  •  Scissors
  •  Glue/Modge Podge 
  •  Glue gun & glue sticks
What to do… Start with the snowman face first:
1.  Take the top off the clear bulb.
2.  Fill it with snowflake sprinkles.  You'll either need a funnel or a piece of paper that you can fold into a funnel-like shape.  This was the part that I found took quite a while (especially with a large bulb…..).  Place the top back on the clear bulb like so:

This is what the bulb should look like once it's filled with snowflakes
3. Take your black paint marker and paint on the eyes and mouth.
4. Take your orange paint marker and paint on the carrot nose.
5.  Let it dry for a few minutes.  You don't want the paint to smudge.

Here's one of the snowmen faces

Next up… The top hat:
1.  Take the pattern and print it out on card stock (this is going to be a part of the actual top hat). 
2.  Cut out the pattern.
3.  Place each part of the pattern on top of the black felt and cut out.  
4.  Now trim down the pattern to where it says on the card stock.

This is what it should look like once your card stock patterns are glued onto the felt cutouts.  
5.  Glue down each piece of card stock onto its matching felt piece.  Let it dry for about 1/2 hour.
6.  Roll the body of the top hat up, and glue with the glue gun where both sides line up.  Hold for a minute.
7.  Glue the bottom of the top hat to the bottom of the body of the top hat.
8.  Place the top hat onto the top of the bulb.  Attach an ornament hook to the top of the bulb and pull through the top of the hat.
9.  Poke the ornament hook through the middle of the top of the top hat.
10. Glue the top of the top hat to the body of the top hat.
11. Glue the top hat onto the head of the snowman.

And you're done!  They are ready to hang up on the tree!  Easy, no?


Enjoy!

A.A.

Sunday, 6 October 2013

Ah! Life needs to slow down a bit...just a bit....

I'm sorry folks!  I know it's been so long since I've posted something!  I'm horrible!  Work has taken over my life and I really haven't been getting home until after 6 most nights...pretty sad when I'm there super early in the morning, and my school gets out at 2:30 each day.....But anyways...I decided tonight to take 5 minutes to myself and create something for the library at work..it's sort of become an annual thing that the kids expect now....so how could I stop doing it?

Looking for something fast and cute for autumn or Halloween?
Look no further!

What do you need?
-Some small gourds, outdoor paint or paint pens.

What do you do?
1. Wipe the gourds off.  You want all the dirt/dust off of them before you begin.
2. Decide on the faces you want to draw/paint on these little guys.  Think silly and funny.  Kids LOVE them!
3.  Paint the faces on!

I promise, that's it!  Easy right?  Here's what I came up with in 5 minutes....so fast, so simple, and so super easy!

Aren't they cute?!
My fave little guy!


Enjoy!

A.A.

Tuesday, 23 July 2013

A little something I decided to try and make today...


So I can't say this is my own idea...
But, I decided to make something I saw online.
It's pretty easy to do and they make a cute little gift.

What you need:
-Small candle wicks
-Large sea shells
-Candle wax

These were some of the shells I picked up

I saved wax that had similar scents and mixed some unscented candle wax from some tea lights I had, in with the scented wax as well.  That way it isn't too overpowering.

Here's what you need to do:
1. Melt the wax in a microwave safe bowl at 30 second intervals.
2. Once the wax is melted (or some of it is at least - it doesn't need to be entirely melted for this part), pour a tiny blob of wax into the shell, place the wick, and hold in place.  Let it sit and harden for a minute or two.

Here's one of my shells with the wax hardening
3. *You may have to melt the wax more at this point, depending on how much you melted for step #2.*  Pour more wax into the shell until it is filled almost to the top of the shell.  I found that I actually had to pour the wax almost in layers in certain types of shells (I'd pour some wax in, then let it sit.  Once it was almost entirely hardened, I'd pour more wax in, and so on...).  It's also important to note that some shells will want to tip and spill wax out the sides (as I learned...).  So it is possible you'll want the shells leaning into something so that they don't tip over.  You could always use play dough or stick tac.
4. Trim the wick and you're done!

Here are the final candles!  Cute or what?!
This is my favourite candle :)
These are super cute to make from that leftover candle wax and seashells you bring home from trips away!

Enjoy!

A.A.

Monday, 15 July 2013

Another Wood Burning Adventure!

So I really like to personalize gifts whenever I get the chance.  Especially when it's for good friends.  So I decided to create another woodburning project for a wedding gift for my friends Katie and Eric.
So I decided to create a little wooden plaque.  Keep in mind this is only the second time I've done woodburning.  But I have to admit, I'm quite content with how it turned out!

All you need to create something like this is: A wood burner (with various interchangeable tips - mine came as a kit (by Walnut Hollow) and I used a 50% off coupon at Michaels to save some $$$), a pencil, eraser, wood, and varnish.

My woodburner kit by Walnut Hollow

I wanted to create something fun, but personalized, so here is what I ended up sketching on the wood:


Now, here are a couple of things I like to remember when I'm woodburning:
  • Take a break every so often (your hands get quite sore!).
  • Always pay close attention to how you are holding the burner.  It doesn't take much for the burner to slip and burn your hand! (not speaking from experience whatsoever.....).
  • Always make sure when it isn't in use that it is turned off, unplugged, and sitting properly in the holder (away from anything else - the last thing you want is for your house to burn down!).
  • Always have a scrap piece of wood handy so that you can brush any ash off, or test any burns/cuts you may want to make.
And here is how the plaque looked as it progressed over time:


*Drum roll please*

Here is the final product! I decided to inscribe the back as well....which took quite a bit longer than I anticipated....along with some extremely sore hands.....
The back of the plaque inscribed

The final product!!!!!! 


Before it was completely finished, I made sure to coat both sides of the plaque in a matte varnish to help preserve it.

I hope Katie and Eric enjoy it!

A.A.

Wednesday, 10 July 2013

A couple more nature photos...

So I actually have been creating...slowly but surely since work got out for the summer.
However, I can't post what I've just finished creating until Sunday.  I will explain in the post.

However, because it's so beautiful out (well...at the current moment it is..that could change at any second apparently), here are a couple of nature shots I've taken over the past few years.

Enjoy!

A.A.
Hibiscus plant in the front room of my house
Aruba on the beach
Waterfalls in Aruba


Sunday, 23 June 2013

Quick Update...

Ah!

I'm sorry for the lack of updates!
Work has been so busy!  However...there are only a few more days until summer vacation! WOOHOO! 

Once summer actually begins, I know I'll be creating more again!

Here are some shots taken on my Nikon D70 over the years.


Enjoy!

A.A

Saturday, 6 April 2013

I know, I know, it's been a while.....

I know it's been a little while since my last post....

Let me start by saying, I had been waiting forever and a day (or so it seems) for the 50% off Michaels coupons to appear in the weekly flier.  My dad used to have a wood burner and I have really wanted one for a while now.  The kit I wanted was normally $44 (with tax) and had 11 different ends with it.  Plus, I had read good reviews about it online.  So imagine the grin on my face this morning when I noticed the 50% off coupon! Score!  I quickly went on the Michaels website, found the coupon, and sent it as a text to my phone (p.s. I love this feature!).  As soon as I heard my phone ring as confirmation, I threw on a hoodie, grabbed my purse, hopped in my car, and drove to Michaels.  Thank goodness it's so close to my house! The anticipation was killing me (patience is not one of my finer points).

I dashed to the back of the store where my future purchase was awaiting and calling out my name, picked it up in my hand, went to the front, and paid.  Twenty-two dollars including tax! SWEET!  Now I really couldn't wait to get home!

So I decided for my first shot at using this tool, I was going to work on a sign.  I wanted to design a little sign for the new little critters I now have in my library (hermit crabs - I put in a pic below of the really active one named Sebastian).  The kids have been excited about them, but I needed a little reminder sign for my new little friends.  And, the other day when I was at Dollartree, I picked up a small, blank, wooden sign for the perfect price of $1.

My cute little friend named Sebastian. Coral didn't want to play for the camera.

So I got to work and I sketched my little sign out...


Then I let the wood burner warm up and got to work (I LOVE the smell of burning wood!)...


After it was done, I added a little spray varnish to it.  Not much to the whole process!  However, I will admit, it can be a little hard on the hands!  Make sure you take a lot of breaks!

Not too shabby for the first time using a wood burner, right?  Now I'm excited about all the other little projects I can create with this bad boy!


Enjoy the rest of the weekend friends!  I'm doing a detox from coffee starting tomorrow.  I think I need to lay off the caffeine...so tomorrow and the next few days could be quite painful....wish me luck!

A.A.

Saturday, 16 March 2013

A Super Easy Gift to Make!

So this is a super easy, non-time consuming project anyone can do.

It's even a great idea for a Mother's Day gift *cough* (men) *cough. (Maybe that comment is why I remain single....). You don't necessarily need to create a tote, but you can create a shirt, or jazz up a towel....the possibilities are endless!  You could even paint up your child's foot or hands and "stamp" them onto the fabric!

Here's what you need:
-Fabric paint.
-Sponges or round thick-bristled paint brushes (not too large).
-Stencils (you can create your own if you have access to a Cricut). Also, I got some stencils cheap at Walmart that I can keep reusing, and they have a sticky back which works well for fabric if you don't want them to move while you're stencil-ing away.
-Plain canvas tote (Go to Michaels and use a 40% or 50% off coupon....that will work out cheaper than Walmart).
-Iron.
-Parchment paper.
-Access to a sink or bucket of water (for dipping the paint brushes/sponges into).


*Before you begin:
Make sure that before you jump in and just start painting, you wash and dry the tote, and then iron it out so it's nice and flat.  You don't necessarily need to iron both sides of the tote. One side (the side you're painting) works just fine!

All you need to do:
1. Layout the paint that you wish to use in little blobs on some parchment paper.  You won't need lots of paint, just a little.  It's like that saying, "a little _____, goes a long way."
2. Once you've washed and dried the tote and ironed it out, decide what you want your end product to look like. You may even want to do a test run on some old fabric or paper before you jump in.  I rarely have the patience to do that...so I usually just jump in with my fingers crossed that I don't mess up.....
*Place a file folder or piece of cardboard in the tote before you begin - that way if the paint seeps through a bit, it doesn't go through to the other side*
3. Place your first choice of stencil on your tote where you want it to be.
4. Dip your brush or sponge in the paint that you wish to apply to the first stencil.  Dab it over the stencil like you are sponge painting (even if you are using a brush) - don't apply the paint like you are painting (it never looks as good...).
4. Once the paint has been applied to that particular stencil, carefully remove the stencil.  I say "carefully" because you don't want any paint from the edges of the stencil to hit the tote as you lift it up.
5. Repeat steps 3-5 as many times as you need to (depending on how many stencil designs you wish to apply).
6. Once your tote (or other project) is complete, let it dry for a good 12 hours.  I wouldn't wash this tote for a few weeks - let the paint set in.
7. Gift it up!

See!  Easy! It makes a great gift idea! *cough* men *cough* for Mothers Day from the kids! *cough*
Here's the one I created for part of my mom's birthday gift:


A.A.


Tuesday, 12 March 2013

Who doesn't LOVE Dr. Seuss?!

Sometimes it's hard to find good inspirational quotes about reading......but I needed one for this particular canvas.....especially seeing as it's another one that I've made for my library.  Who better than Dr. Seuss for a good quote about reading!

So here's the final quote I decided on (courtesy of Dr. Seuss of course!):
“The more that you read, the more things you will know. The more that you learn, the more places you'll go.”  Perfect, isn't it?

Materials I used for this piece:
-Canvas
-Gesso to prime the canvas
-Parchment paper
-Paint brushes in a variety of sizes
-Acrylic paint in a variety of colours (I did some mixing as well)
-Bucket of water
-Pencil
-Eraser
-Paint brush cleaner (for afterwards)

The Method to my madness:
1. I primed my canvas with gesso and let it dry 24 hours.
2. I sketched my pal the Cat in the Hat on a piece of paper first.  Once I was happy with him, I actually put a piece of parchment paper over him and traced him with a sharpie (I knew if I didn't do this I was doomed to mess it up on the canvas....).
3. I flipped the parchment paper over and traced what I had just done with the sharpie (the hard thing to remember that when you go to trace an image you've put on parchment paper and flip it over on the canvas.....is that it will be backwards...that's why I always flip it over and sharpie it on the other side as well....).
4. I put the parchment paper over the canvas (the "backwards way" - aka the last tracing I just did is the side you want down ON the canvas).  Then I go over it/trace it on my canvas.  I'm a perfectionist which is why I sketched it on paper first and then traced it on parchment paper.  You'll have to go over it in pencil, but this helps make sure your sketch looks as good as it does on the paper.
5. I had to do a bit of research into the Dr. Seuss fonts.....because other fonts just didn't look right when I sketched them out on paper...the quote NEEDED this Dr. Seuss-ish font.  You can find them actually to download no problem into Word, but the problem I had was the spacing aspect....it didn't look right when I typed the quote in.....so I did it the long way......I printed out the whole alphabet in the size I was happy with and traced the letters in the quote on parchment paper.  I tried doing it by hand...but it just didn't look as good....and it had to be perfect.....Once I finally had the whole quote written out, I flipped it over (remember, it will be backwards otherwise) and sharpie traced it onto the other side.  Then, I went over it with my pencil on the canvas, took the parchment paper off, and touched up the letters with my pencil.
6.  I did a bit more research for this part - the books needed to look like they were done in Dr. Seuss style.  So I looked at Cat in the Hat images online and found some pictures where the Cat was balancing books as a part of the stack of items he was balancing on his head.  So I took my pencil to the canvas and sketched three books in different directions, at different angles in the top right-hand corner.  You're probably wondering why 3 books?  In art you always want an odd number.  It always looks better from a design aspect...so that's why I choose 3 books.  I was going to add the fish from Cat in the Hat...but I didn't like how he looked on my canvas....so I took him off and painted over him....

Here's the final sketch!
7. The most exciting part of the process!  Time to paint!  I painted the light background first.  I had to mix a couple of colours to get the final colour to look just right.  After I had painted the background, I did the letters.  Once the background and letters were painted, I painted the books and the Cat himself!  Touch-ups were the final step, which of course took quite a while believe it or not.  It had to look just right.

Here's what the canvas looked like over the whole process of painting:

*Don't mind the quality of the pics - they were taken on my phone!

Here's the final product!


Enjoy the break!

A.A.


Saturday, 2 March 2013

Just a little piece I did....

Well I decided to play around and try to shed the winter blues the other day.  I'm so done with winter.....

So I bought some masking and did some watercolours...Nothing big....Just played around because I hadn't used masking before...so I wanted to give it a try and do something plain Jane....

Materials:
-Brushes (various sizes)
-Masking
-Watercolours
-Water
-Something to scrape the masking off
-Pencil
-Outliner
-Sponge

Method to the Madness:
1. Sketch out your image/design.
2. Carefully place the masking on.  I used tooth picks...wasn't up for damaging a paintbrush....
3. Water down the paper lightly with a sponge.
4. Paint with your watercolours.
5. Once it's slightly dried, start peeling off the masking with your sharp tool (not too sharp though - we aren't talking knives folks).
6. Once the painting is dry, outline with your archival pen (if you wish...I was up in the air as to whether or not I was actually going to outline...it looked fine without...but what the heck...I did it anyway...).
7. And you are done!

P.S. I realized I hadn't outlined the inside of the right-hand wing on the butterfly after I took this pic...so I fixed it and it is outlined now.....Oops!


Like I say, I decided to put the tunes on, play around and take my mind off the winter weather.

A.A.

Sunday, 24 February 2013

Bring on Spring!

Okay, I'll admit it.  I have the winter blahs and can't wait for spring!
Plus, I needed a good stress reliever and what better form of relaxation than art!

I got the button art idea from Pinterest and loved the way it looked, so I decided to give it a shot.
Plus, I love those "Advice from a..." posters/art I have seen online.  They're full of great wisdom and advice!  They've got all different ones...like "Advice from a Rainbow"..."Advice from a Stream," etc.  So I put the two together and added some paint to jazz it up a little more.

These are the materials you need for this mixed-media creation:
-Buttons (green in this case) - you can get a whole wack of whatever colour you want from Dollartree for $1!  They are amazing!
-Canvas
-Paint
-Paintbrushes in a variety of sizes and shapes
-Hot glue gun & glue sticks
-Words of wisdom

Here are the steps you need to follow in order to create something similar:
1. Sketch out your creation on the canvas.
2. Start painting (I usually start with the sky first because it's the lighter of the colours.
3. Always add the words of wisdom last.
4. Once it's dry, place the buttons on the skeleton of the tree.  I placed all of mine first and then glued them on because it's all about looking right...and trust me, there were many buttons I had originally placed on this tree that I had to remove because they just didn't look right!
5. Once it's dry, remove all the hot glue strings (this takes a while, and to be honest, I needed to bust out my tweezers to get a number of small strings removed...).

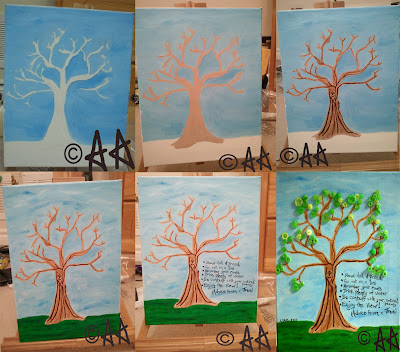
Here's how my tree looked as it progressed (yes, I did remember to take pictures this time!).....


And here is my final product!


Enjoy the rest of the weekend!
A.A.


Saturday, 16 February 2013

Look what I made for the kids @ work!

Got some extra rice kicking around the house?  Make an I Spy game!
After all, what kid doesn't love the I Spy books?!


Okay...so I needed to do something with a HUGE bag of rice I had that I couldn't cook (because I used it to absorb coffee when I spilled coffee all over my carpet and my laptop chord......urgh!). I can't take credit for the idea...but I can take credit for putting this together and making a couple of the little pieces from Fimo.....Actually, I had so much rice from my little incident that I created two of these I Spy games - one for my mom's classroom and one for my library :).

I got the idea from Pinterest (I can't get enough of that site....).  This is a nice easy project, but it can be a little time consuming to put together.....It's worth it in the end though!

Here's what you need to make your own I Spy game:
-A plastic or glass jar with a lid (unfortunately I couldn't get a transparent plastic one....)
-Duct tape
-Paint pen (for writing on the top)
-Objects to search for (i.e. a marble, a letter, a number, a leaf from a fake plant, a star, etc.)
-Recipe cards
-A camera
-A Sharpie
-Rice

Procedure:
1. Take pictures of all of the objects.  Load the pictures onto your computer.
2. Put some of the rice in the jar.
3. Put some of the objects in the jar.
4. Put more rice in the jar.
5. Put the rest of the objects in the jar.
6. Fill the rest of the jar with rice.  You may need to unscrew the lid, shake it up, place more rice in, screw the lid on and see if you can add any more rice.  I had to do this several times because when I thought it was full enough....it turned out it wasn't....
7. Send your pictures to get printed (or print them off from your own printer - it just depends on how you want to format your picture cards).
8. Once your pictures are printed, cut them out with a paper cutter and then glue them onto index cards.  Some people put small pictures of all of the objects onto one large card.  That's another option.  You can get really creative with this part.  I kept mine pretty plain Jane.  I just wrote "I spy...." and then the object name at the bottom of the card.

This is how my final set of cards turned out :)
9.  Hole punch each card and put on a binder ring (you can get these at the Dollar Store).
10. Duct tape the circumference of the jar (top) so that kids can't pull the lid off.  I'm also going to be writing a little reminder that if anyone attempts to remove it, the privilege is removed for all students.....I also plan on keeping mine on my desk with a sign about only teachers being able to carry it.....so that the kids don't just take it on me....

This is the final product:

Minus the duct tape....I put that on afterwards!
And again - different angle
I put one super challenging little shape in.......My Nanna gave it a test run and it took her about 30 minutes to find every shape in the jar (because of the tiny gold star....I like a challenge, what can I say...).  I also plan on putting a pretty little bow at the top....

It's definitely a great way to keep kids busy!

Enjoy the Family Day weekend!

A.A.

Sunday, 13 January 2013

Just a little somethin'

So I kind of wanted to jazz up a birthday gift for my sister's fiancĂ©.  It looked plain and lame.

I decided to make a mini monster gift bag for the iPod adapter for his new iPod (for those of you who don't know, the new iPod plugs/adapters are different because they changed them....which I'm sure Steve Jobs is rolling in his grave about as we speak...).  I plan on making more of these in the future and even changing some from little baggies to gift card holders.  They're a cute little way to jazz up a gift.

The materials you need for this project are:

  • Fabric and felt of your choice
  • Needle and thread
  • New sew fabric glue
  • Buttons
  • Ribbons
  • Yarn in a variety of colours
  • Fabric scissors
  • Ruler
Here's the procedure for this project:

1.  Measure the object you need your monster bag for (in my case it was an iPod adapter).  Adjust the measurement so that there is about an inch extra around the perimeter (for sewing and goof-ups).  Make sure you draw the shape you need to cut out.
2.   Cut out the shape.
3.   Trace this shape on the fabric.
3.   Cut out.
4.   Flip the two shapes so that they are upside down.  
5.   Start sewing around the outside edges.
6.   Once you have sewn all but one side, flip your baggie from being inside out so that it is no longer inside out.
7.   Place a button where you wish it to be acting as an eye.  Sew this eye on (you may need to flip your baggie inside out again).  Repeat this step for eye #2 (if you want 2 eyes - you could always do a cyclops monster).
8.   Cut out teeth or a mouth from felt and glue on with fabric glue.
9.   Cut out a nose from felt and glue on with fabric glue.
10. Cut some small (or long - depending on which you prefer) yarn pieces and take the yarn apart (I like to call it dissecting...I know.....I'm morbid.....lol).  Arrange and glue this yarn onto your monster.
11.  Add any additional accents or pieces to your monster.
12.  Let your monster dry overnight.
13.  Place your gift in your baggie.

I guarantee people will enjoy this!  It's such a simple way to jazz up a gift and the possibilities of this are ENDLESS.

Here's my final product!


Have fun!

A.A.

Sunday, 6 January 2013

Urgh! I hate it!

So those of you perfectionists out there will understand my pain and frustration.

I created a piece of work (crayon art to be exact) over this holiday break and I HATE it.  Originally I had designed it for work for the kids to enjoy....but I'm not sure it will ever make it's way up on the wall because I can't stand the damn thing.  And I mean, who wants to stare at something all the time when they can't stand it, right?

So, with crayon art, you know the drill......

1. Sketch it all out on your canvas.
2. Choose your crayons, break 'em, and glue em.
3. Take your hair dryer and melt your crayons over the canvas.
4. Paint around the scene.

Believe it or not, I re-did so much of this whole piece I'm surprised I didn't just take an x-acto to it (yes, I have been known to do that with pieces I create (or start to create) and don't like).

So here is the beast I can't stand.....Believe it or not I did remember to take pictures as it progressed.  There was one point where the grass was a dark green and the sky was a dark blue...and all of the flowers were different colours as well.....I re-did this whole thing so much I can't stand looking at it...but here it goes....


Currently it is sitting on my little table-top easel, but I'm tempted to kick it off and stomp on it.....

A.A.