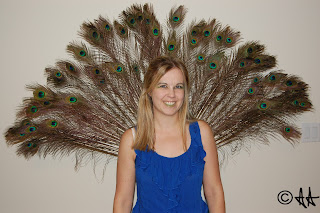
I made my costume.....that's right.....you read correctly. I MADE my costume........
I was in Dollarama and saw peacock feathers, and that's when I instantly knew what I had to be!
Luckily I had some royal and sapphire shaded blue clothing....so I didn't have to buy anything like that. Although, I have to admit, I was sorta torn between bright green clothing as well......But...now you know why I did the bright blue clothing......(one less thing to buy!).
For my costume I clearly needed to make a fan tail of feathers, and I also decided to make a tutu to go with it (why not?!).
Here are the materials you need to make my costume:
-A hand fan (mine was made of a light wood)
-LOTS of feathers (Dollarama is the way to go)
-Hot glue gun & glue sticks
-Fabric
-Thick cardboard
-Elastic
-Scissors
-Tulle (I used blue, a green, black, and a blueish-green)
-Needle
-Thread
The tutu was the easiest thing to make....but it definitely took about 6 hours to make. You need patience (which I clearly lack.....) to make this......
First, you need to measure the elastic against your waist and cut any excess off (make sure you leave extra though because you do need to carefully sew the ends together). Next, cut your tulle into long strips. You will want to measure one strip first. It really depends if you want a short tutu or a long tutu. If you have your main portion of tulle measured to the correct length, there is a shortcut to cutting it. If you youtube it, you should be able to find a cutting tulle tutorial. It involves rolling it and then cutting it. That way cutting all of your tulle will only take about 5 minutes. I decided on a mid-length tutu (I'm wearing it Wednesday for the kids at work). Next, start taking 1-2 strips at a time (depends if you want it a bit thicker), and knot the end of the tulle strip around the elastic. Continue doing this with your strips of tulle until the waist is full. Like so:
*In progress
*Done!
*This was with green leggings...which I woulda done if they weren't so see through......Oops!
Now the fan was my biggest challenge. I went to Dollarama and bought a wack of feathers. Luckily I had a friend who had a spare hand fan for the main base of my fan tail. Then, I also bought some green fabric, found some thick cardboard, and then wound up requiring some elastic to attach my fan tail to my arms.
So, here we go:
First I took my fan and started to glue feathers all the way around it. You may need to trim some feathers. So your fan should look like this:
Next, I took two pieces of thick cardboard and traced a rough outline of the fan shape. Then, I cut both pieces of cardboard out. Then, I took the fabric and cut it. After that, I glued the fabric to the cardboard. Once that was set, I glued one piece of cardboard (and fabric) on the one side of the fan, and the other piece to the other side of the fan, so that the actual fan tail itself was sandwiched in the middle. Once that was done I had to measure the elastic around my arms, and I glued the elastic to the fan. Like so:
Now, here's the final result (which I'm sooooo happy with!!! I can't wait to wear it again!):
*The full costume
*Me again
*Close-up of my fan tail!
Have a Safe & Happy Halloween!
A.A.


